Varnish is an HTTP accelerator (cache) application. We make heavy use of Varnish here at Revenni and recently started deploying it alongside Hitch.
Varnish is designed to sit in front of your web server and have all clients connect to it. You configure your web server as a backend to Varnish, when a client requests a document Varnish will retrieve the document from the webserver and keep a copy of it in memory. When the next client requests the same document, Varnish serves it directly from memory instead of hitting your webserver and therefore middleware/database/disk.
The one glaring “problem” with Varnish is that it was built specifically to avoid SSL support. You can find the full story on that decision here and here.
HITCH TO THE RESCUE
“Problem” solved.
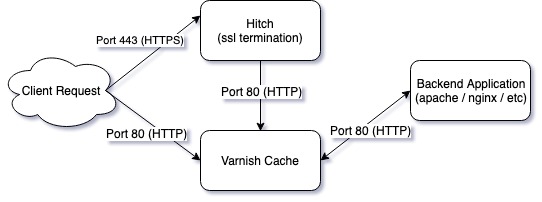
Varnish Software has developed Hitch, a highly efficient SSL/TLS proxy in order to terminate SSL/TLS connections before forwarding the request to Varnish. Hitch supports tens of thousands of connections and up to 500,000 certificates on commodity hardware.
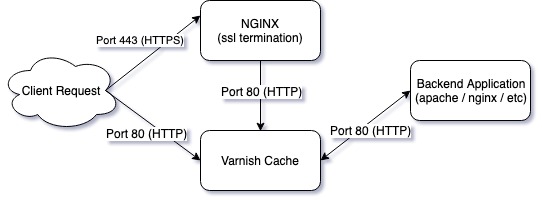
Hitch does one thing and does it incredibly efficiently. We have also used NGINX in order to terminate SSL connections before proxying to Varnish. That worked very well and we still support that configuration for a lot of clients.

Hitch fits exactly where NGINX did in the chart above.

So how do you get started?
1. INSTALL HITCH
Compiling Hitch from source will get you the latest features including TLS 1.3 and unix domain sockets for Varnish communication. We’re going to cover Hitch 1.4.4 which is in the Ubuntu LTS (18.04) repository.
2. GENERATE HITCH.CONF
Hitch installs without any configuration. You can copy the example configuration from /usr/share/doc/hitch/examples/hitch.conf.example to /etc/hitch/hitch.conf, or use our slightly modified version below.
3. ENABLE HITCH
To summarize below starting hitch:
- Hitch will listen on all ip addresses, on port 443
- Hitch will terminate SSL/TLS for all certificates using SNI and pass them to varnish on port 6086

